
Easy Chicken Cobbler Dinner Casserole

A comforting, weeknight-friendly casserole that layers shredded chicken and vegetables beneath a biscuit-style topping for an effortless, family-pleasing dinner.

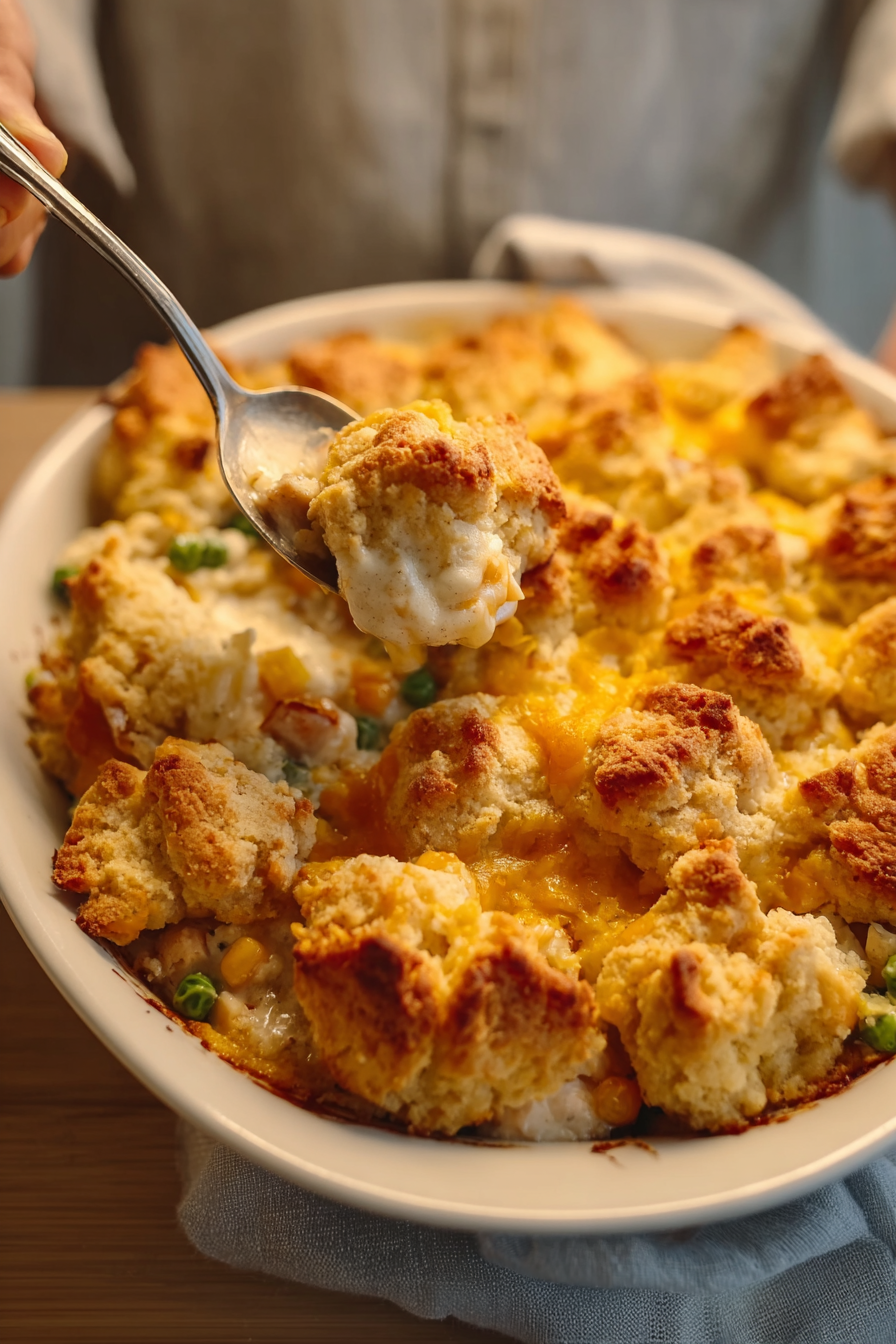
This Easy Chicken Cobbler Dinner Casserole became a staple in my kitchen the week I had three late nights in a row and a fridge full of leftover rotisserie chicken. I wanted something that felt homey and special without a long ingredient list or fuss. The result is a layered dish that tastes like Sunday dinner—rich, creamy, and gently savory—yet it comes together quickly and bakes into a golden, bubbly finish that smells irresistible. I first made it when my cousin dropped by unexpectedly and ended up staying for dinner; she raved that it tasted like the kind of comfort food her grandmother made. Ever since, it’s become my go-to for potlucks, busy weeknights, and when I need something everyone will happily eat.
What makes this casserole special is the contrast of textures and the simplicity of assembly. A thin bed of melted butter becomes the flavor base, followed by a layer of shredded chicken and frozen mixed vegetables. Two wet mixtures—one with a biscuit mix and milk, the other with cream of chicken soup and broth—are poured over without stirring. During baking the biscuit mix rises into a golden, cheesy cobbler-like crust while the sauce beneath thickens into a creamy gravy that coats the chicken and veggies. It’s the sort of dish that comforts without requiring hours at the stove, and it scales easily when you have guests or want leftovers for the week.
Why You'll Love This Recipe
- Layer-and-bake method: no mixing of wet and dry layers prevents sogginess and results in a golden biscuit-like topping while the filling becomes a rich, spoonable sauce.
- Time-saving: uses shredded rotisserie chicken and a packaged biscuit mix, so active prep is under 20 minutes and it bakes while you relax; ready in about 65 minutes total.
- Pantry-friendly: relies on common staples—canned soup, chicken broth, frozen vegetables—so you can assemble it on short notice.
- Crowd-pleaser: mild, familiar flavors appeal to kids and adults; it’s easy to adapt with different veggies, cheeses, or spice blends for dietary needs.
- Make-ahead friendly: can be assembled a day ahead (keep refrigerated) and baked when you’re ready, or baked and frozen for later reheating.
In my experience this dish wins over picky eaters: my neighbor’s son declared it his new favorite after one bite, and I often hear that the biscuit top is what seals the deal. It’s always the first casserole to disappear when I bring it to a gathering.
Ingredients
- Butter (1/2 cup, 1 stick, melted): Use unsalted or lightly salted butter depending on how much additional salt you plan to add. I prefer a high-quality European-style butter for deeper flavor, but any household brand will yield a satisfying golden base.
- Shredded chicken (4 cups): Rotisserie chicken is my shortcut of choice for juicy, seasoned meat. You can also poach boneless skinless breasts or thighs and shred them; dark meat provides more richness.
- Frozen mixed vegetables (12 ounce bag): Look for a blend with carrots, peas, and corn for color and texture. If fresh seasonal vegetables are available, briefly blanch or steam before layering to ensure they finish tender in the casserole.
- Red Lobster Cheddar Bay Biscuit Mix (11.36 ounce box): This boxed mix gives the topping a cheesy, garlicky flavor and the included seasoning packet saves a step. If you prefer, substitute a regular biscuit mix plus 1/2 cup shredded cheddar and 1 teaspoon garlic powder.
- Whole milk (2 cups): Provides richness and helps the biscuit mix hydrate and rise properly. You can use 2% milk for a slightly lighter result but expect a slightly less rich crust.
- Chicken broth (14.5 ounce can, about 2 cups): Use low-sodium broth if your soup or biscuit mix is salty; this gives you more control over final seasoning.
- Cream of chicken soup (10.5 ounce can): Acts as the creamy binder in the filling. For a homemade touch, substitute a simple white sauce (roux with milk and chicken stock) but the canned version keeps prep quick.
- Seasonings: I use garlic powder, onion powder, and black pepper—go light on additional salt because the biscuit mix and soup contain sodium.
Instructions
Preheat and Prepare: Preheat the oven to 375 degrees F and generously grease a 9x13-inch baking dish. Greasing the sides helps the biscuit topping release and prevents the filling from sticking—use butter or a neutral oil spray. Allow the oven to fully reach temperature before baking to ensure even browning. Butter Base: Melt 1/2 cup (1 stick) of butter and pour it evenly across the bottom of the prepared dish. Tilt the dish so the butter coats the entire base; this creates a rich, savory base that helps the biscuit mix bubble and brown from underneath. Layer Chicken: Spread 4 cups of shredded chicken in a single, even layer over the melted butter. Pat the chicken down gently so the layer is relatively flat; this promotes uniform baking and helps the biscuit layer sit evenly on top. Add Vegetables and Season: Evenly scatter the frozen mixed vegetables (about 12 ounces) over the chicken. Sprinkle garlic powder, onion powder, and black pepper to taste, remembering the salt content in the canned ingredients. Do not thaw the vegetables first; the frozen state helps them release moisture slowly and stay tender. Make Biscuit Mixture and Pour: In a medium bowl, whisk together 2 cups whole milk, the 11.36 ounce Cheddar Bay Biscuit Mix, and the seasoning packet that comes with the mix until mostly smooth. Pour this mixture evenly over the layered chicken and vegetables. Important: do not stir. The dry biscuit mix will hydrate and rise into a crust while baking if left undisturbed. Mix Soup and Broth: Using the same bowl (no need to clean), whisk together the 10.5 ounce can of cream of chicken soup and the 14.5 ounce can of chicken broth (about 2 cups total) until smooth. Pour this evenly over the biscuit mixture. Again, do not stir. The two poured layers will interact during baking to create the sauce beneath the crust. Bake Until Golden: Bake uncovered on the center rack for 55 to 65 minutes, or until the top is deep golden brown and the filling is bubbling at the edges. Ovens vary; in my oven it takes the full 65 minutes. If the top is browning too quickly, tent loosely with foil for the last 10 minutes. Rest and Serve: Remove the casserole and let it rest for about 10 minutes before serving. Resting lets the sauce thicken and makes portioning cleaner. Serve straight from the pan in generous scoops so each portion has a mix of crust, creamy filling, chicken, and vegetables.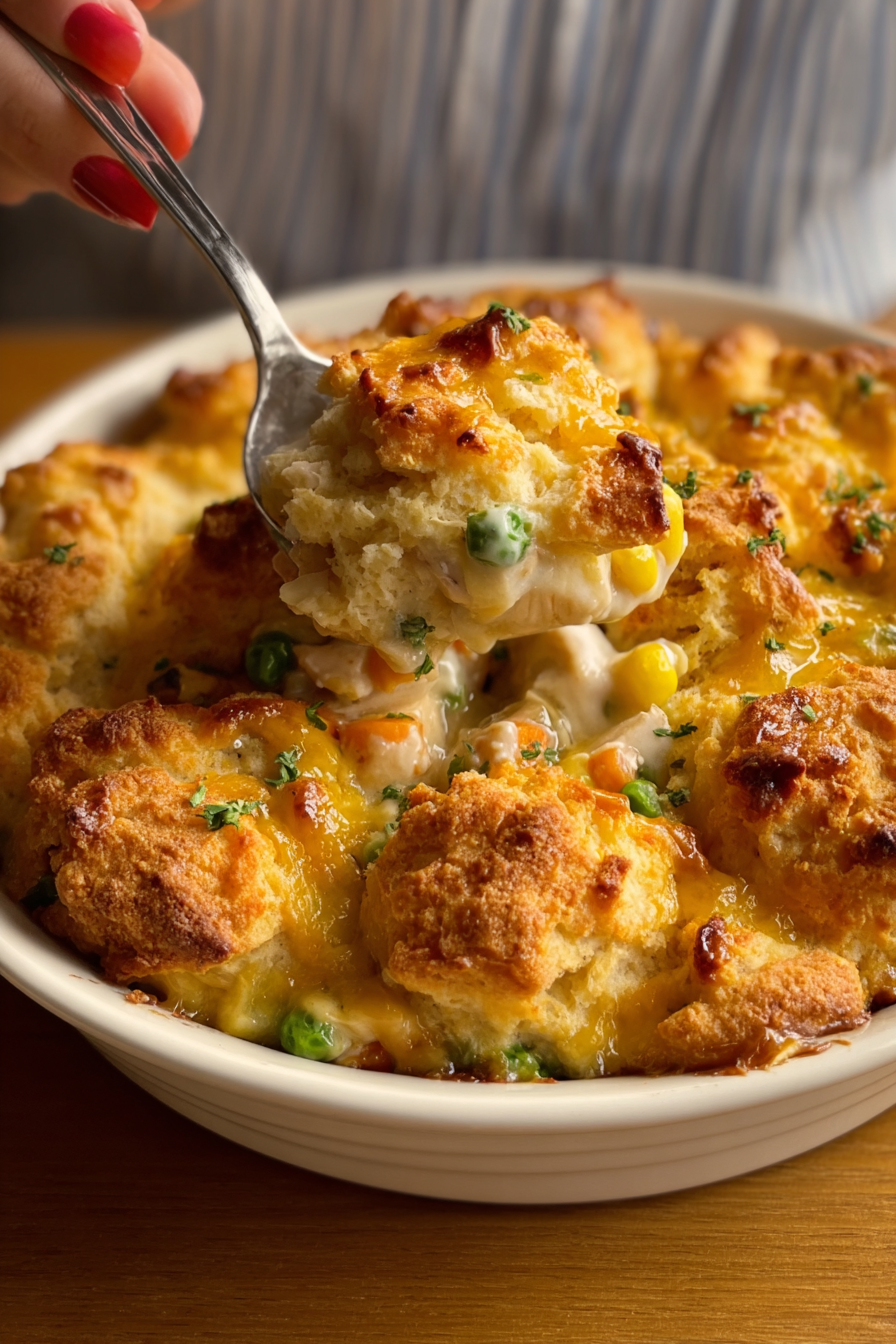
You Must Know
- The casserole freezes well: bake it, cool completely, wrap tightly, and freeze for up to three months. Reheat covered at 350 degrees F until warmed through.
- Because of canned soup and mix seasoning, it can be high in sodium; using low-sodium broth or a light hand with added salt helps balance it.
- This dish is high in protein due to the chicken and satisfying as a full meal—pair it with a crisp green salad for balance.
- Resting for 10 minutes is crucial: cutting too early makes the sauce runny; patience yields cleaner slices and thicker gravy.
My favorite aspect is how forgiving the assembly is. I’ve customized it at the last minute with extra cheese, sprinkled fresh herbs on top, or swapped in seasonal veg. Family members often request the biscuit topping to be slightly crispier, so I sometimes finish it under a broiler for 1 to 2 minutes while watching carefully.
Storage Tips
Store leftovers in an airtight container in the refrigerator for up to four days. Reheat individual portions in the microwave for 1 to 2 minutes until warmed through, or reheat the whole casserole covered with foil at 350 degrees F for 20 to 30 minutes. For freezing, cool completely, wrap the dish tightly in plastic and foil, and freeze for up to three months. Thaw overnight in the refrigerator before reheating. Look for bubbling edges and a warmed center as indicators that the casserole is fully reheated.
Ingredient Substitutions
Swap the rotisserie chicken for poached or shredded leftover turkey if you prefer. Use a gluten-free biscuit mix to make the topping gluten-free; note texture differences and consider adding 1/4 cup extra milk for hydration. Replace the cream of chicken with cream of mushroom or a homemade white sauce for a different flavor profile. For a dairy-free version, use a nondairy milk and a dairy-free biscuit mix, though results will differ in richness and color.
Serving Suggestions
Serve this casserole with a crisp green salad dressed in a tangy vinaigrette to cut the richness, or alongside roasted asparagus or green beans for added texture. Garnish portions with chopped fresh parsley or chives for color and brightness. It’s hearty enough to be the main course but pairs well with crusty bread if you want more to soak up the sauce.
Cultural Background
The concept of layered, baked dishes with a biscuit or dumpling topping has roots in American comfort cooking, where casseroles evolved as practical, one-dish meals. This version adapts the biscuit-top tradition to a chicken-and-vegetable context, borrowing the cheddar and garlic notes of Cheddar Bay biscuits popularized in casual American seafood restaurants to create a familiar, homey flavor.
Seasonal Adaptations
In winter, enrich the filling with roasted root vegetables and swap peas for diced parsnips. In spring and summer, use fresh peas, tender carrots, and a squeeze of lemon in the finished dish to brighten flavors. For holiday meals, replace mixed veg with a medley of roasted Brussels sprouts and sweet potatoes and add a teaspoon of fresh thyme to the soup-and-broth mixture.
Meal Prep Tips
Assemble the casserole in the baking dish up to one day ahead, cover tightly, and refrigerate. When ready to bake, allow the casserole to sit at room temperature for 15 minutes while the oven heats, then bake as directed. Portion into single-serve containers after baking for easy weekday lunches—reheat in the microwave and add a fresh side salad for a balanced meal.
This casserole is about the joy of simple, dependable food shared with people you love. It’s flexible, forgiving, and always manages to make evenings feel a little more connected. I hope it becomes a favorite in your household as it is in mine—easy enough for busy nights and special enough for unexpected guests.
Pro Tips
Grease the sides of the baking dish well to prevent sticking and make serving easier.
Do not stir the layers after pouring; the biscuit mix needs to sit undisturbed to rise into a crust.
If the top browns too quickly, tent loosely with foil for the final 10 minutes of baking.
Use rotisserie chicken to save time and add extra flavor, or shred leftover roasted chicken for a similar result.
This nourishing easy chicken cobbler dinner casserole recipe is sure to be a staple in your kitchen. Enjoy every moist, high protein slice — it is perfect for breakfast or as a wholesome snack any time.
FAQs about Recipes
Can I freeze this casserole?
Yes. Bake the assembled casserole until hot and bubbling, cool completely, wrap tightly, and freeze for up to three months. Thaw in the refrigerator overnight before reheating.
Why does the casserole need to rest before serving?
Let the casserole rest for 10 minutes after baking so the sauce thickens and portions hold their shape.
How can I reduce the sodium in this dish?
Use low-sodium broth or reduce added salt because the biscuit mix and canned soup already contain salt.
Tags
Easy Chicken Cobbler Dinner Casserole
This Easy Chicken Cobbler Dinner Casserole recipe makes perfectly juicy, tender, and flavorful steak every time! Serve with potatoes and a side salad for an unforgettable dinner in under 30 minutes.
Ingredients
Base
Vegetables
Topping
Filling
Instructions
Preheat and Grease
Preheat oven to 375 degrees F and grease the sides of a large 9x13-inch baking dish with butter or nonstick spray to prevent sticking.
Melt Butter and Prepare Base
Melt 1/2 cup (1 stick) butter and spread it evenly across the bottom of the prepared dish; this forms the flavor base for the casserole.
Layer Chicken
Add 4 cups of shredded chicken in a single, even layer over the melted butter so the protein is distributed uniformly.
Add Vegetables and Season
Evenly place the frozen vegetables over the chicken and sprinkle with garlic powder, onion powder, and black pepper; avoid extra salt due to canned ingredients.
Prepare Biscuit Mixture and Pour
In a medium bowl, whisk together 2 cups whole milk, the Cheddar Bay Biscuit Mix, and the mix’s seasoning packet until combined; pour evenly over the chicken and vegetables without stirring.
Mix Soup and Broth and Pour
Whisk the cream of chicken soup with the can of chicken broth until smooth and pour evenly over the biscuit mixture. Do not stir; layering is important for crust formation.
Bake
Bake uncovered on the center rack for 55 to 65 minutes, or until the top is deeply golden brown and the filling is bubbling at the edges. Tent with foil if browning too fast.
Rest and Serve
Remove from the oven and let rest for about 10 minutes to allow the sauce to thicken before serving in portions that include topping and filling.
Last Step: Please leave a rating and comment letting us know how you liked this recipe! This helps our business to thrive and continue providing free, high-quality recipes for you.
Nutrition
Did You Make This?
Leave a comment & rating below or tag
@veralkitchen on social media!
Categories:
You might also like...
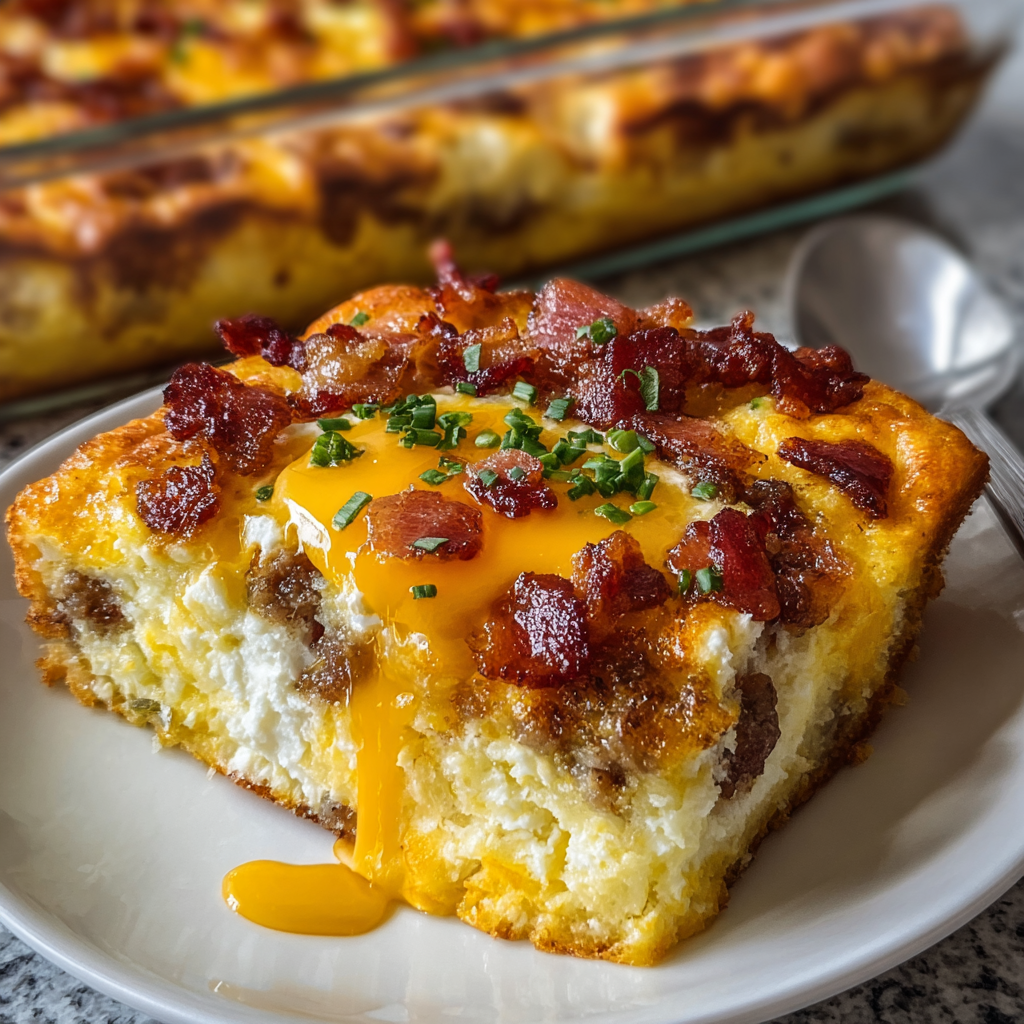
Crack Breakfast Casserole
A decadent, crowd-pleasing layered casserole with sausage, bacon, tender hash browns, and a creamy ranch-egg custard topped with melty cheddar.
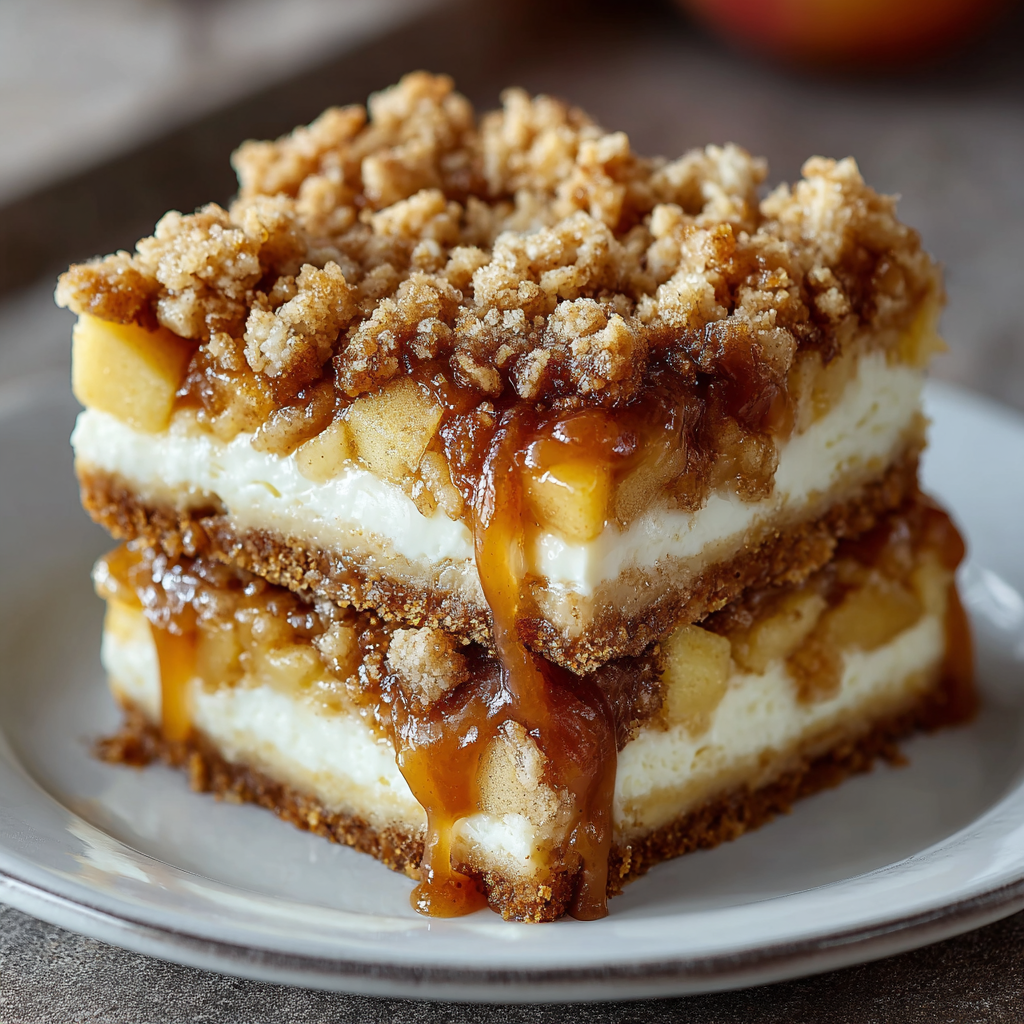
Apple Crisp Cheesecake Bars
Buttery crust, a creamy cheesecake center, cinnamon-scented apples, and a crunchy oat topping—these bars are a brunch-ready hybrid dessert that’s irresistible.

Classic Apple Crumble
A warm, comforting apple crumble with a buttery, crumbly topping and tart-sweet Granny Smith filling—perfect with a scoop of vanilla ice cream.
Did You Make This?
Leave a comment & rating below or tag @veralkitchen on social media!
Rate This Recipe
Share This Recipe
Enjoyed this recipe? Share it with friends and family, and don't forget to leave a review!
Comments (1)
This recipe looks amazing! Can't wait to try it.
Comments are stored locally in your browser. Server comments are displayed alongside your local comments.
Hi, I'm Julia!
What's Popular
Get My 30-Minute Meals email series!
Quick and easy dinner ideas delivered to your inbox.