
Christmas Rice Crispy Treats

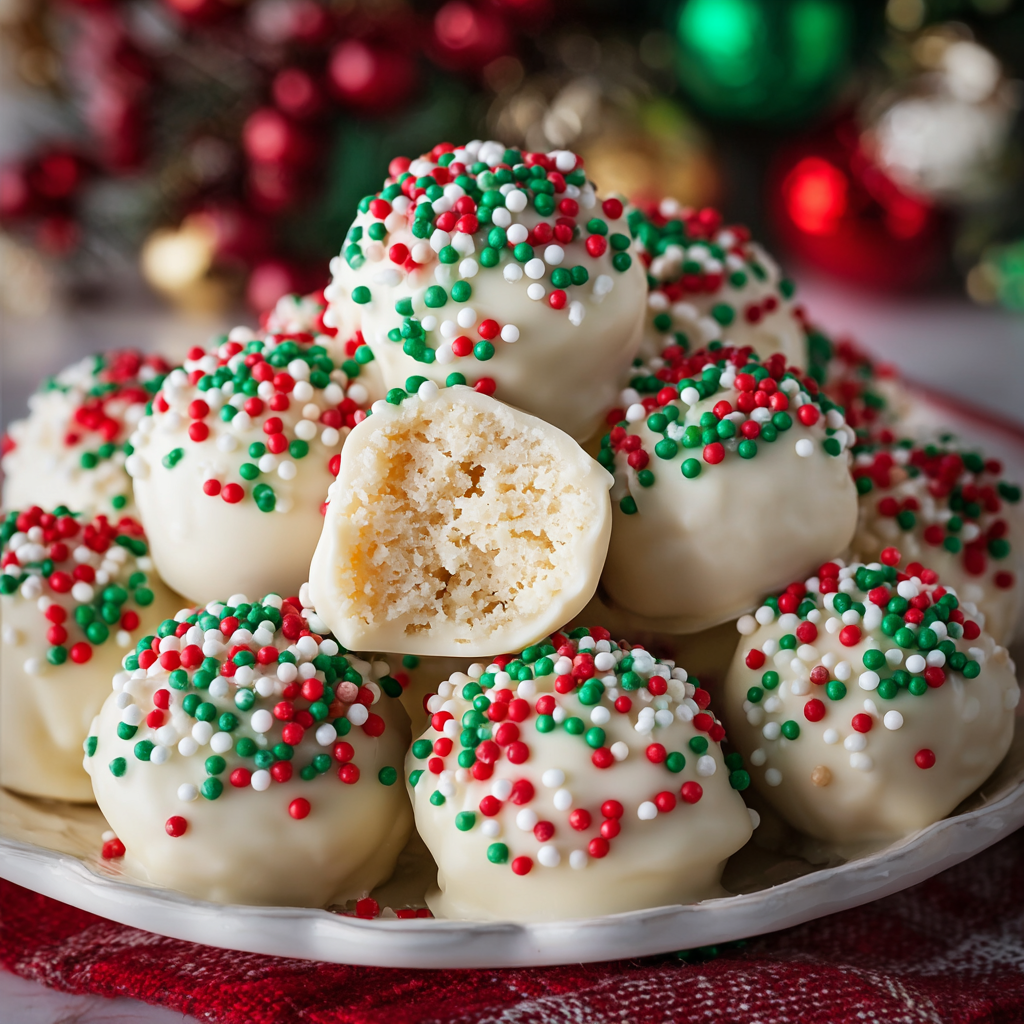
Festive bite-sized rice crispy balls coated in white chocolate and topped with red, green, and white sprinkles—perfect for holiday parties and gifting.

This recipe for Christmas Rice Crispy Treats has been my go-to holiday sweet for years. I first made these during a cluttered December evening when I needed an easy, portable treat for a school party and a last-minute cookie exchange. The combination of pillowy marshmallow, crisp puffed rice, and a glossy white chocolate coating studded with red and green nonpareils felt instantly festive. They are nostalgic in texture but dressed up for the season, and the small, bite-sized shape makes them irresistible at gatherings.
What makes these treats special is how quickly they come together and how customizable they are. The interior is soft and chewy with satisfying crunch, while the white chocolate exterior adds creamy sweetness and a clean canvas for those classic Christmas colors. Over the years I’ve learned small techniques—like letting the mixture cool just enough to handle and adding a touch of coconut oil to smooth the chocolate—that elevate the final result from good to memorable. I love watching kids’ faces light up when they pick one off the platter; it always feels like holiday magic in a little ball.
Why You'll Love This Recipe
- Ready in about 30 minutes from start to finish, making it ideal for last-minute parties and school events.
- Made with pantry staples—puffed rice, marshmallows, butter, and white chocolate—so you likely have everything on hand.
- Bite-sized portions are perfect for grazing, platters, gift boxes, and cookie swaps; no slicing required.
- Coated in white chocolate for a smooth finish that lets festive red, green, and white nonpareils really pop.
- Simple technique that’s approachable for cooks of all levels; kids can help roll and decorate with minimal supervision.
- Make-ahead friendly: they keep well refrigerated and travel easily in airtight containers for gifting or potlucks.
Personally, these treats became a holiday tradition after my first batch was devoured at a neighborhood open house. Family and friends started requesting them each year. I enjoy tweaking the coating and sprinkle patterns—some years I drizzle green and red chocolate, other years I stick to the classic nonpareil look. They always disappear fast, which is the best compliment.
Ingredients
- Puffed rice cereal (3 cups): Choose a light, crispy puffed rice such as a classic brand rice cereal. Avoid granola or clusters; you want individual grains for the best texture. Three cups yields about two dozen bite-sized balls.
- Mini marshmallows (1 1/2 cups): Regular mini marshmallows melt easily for a smooth binding texture. If you only have larger marshmallows, cut them into smaller pieces or use 10–12 standard marshmallows. I sometimes use 1 cup mini marshmallows plus 1/4 cup marshmallow fluff for extra chew.
- Unsalted butter (4 tablespoons): Butter adds richness and prevents the marshmallow from becoming gluey; unsalted lets you control saltiness. Use European-style butter if you want a slightly creamier flavor.
- Vanilla extract (1 teaspoon): A small amount of pure vanilla rounds out the sweetness and gives a warm aroma—don’t skip it.
- White chocolate chips or candy melts (2 cups): Use quality white chocolate chips or candy melts for ease. If melting real white chocolate, temper carefully or add a touch of coconut oil to smooth the texture.
- Coconut oil (1 tablespoon, optional): Helps loosen and shine melted white chocolate for a silky coating. Use only if needed to thin thicker candy melts.
- Nonpareils (1/2 cup): Red, green, and white sprinkles add festive color and a tiny crunch. You can mix colors or use all one hue for themed parties.
Instructions
Make the rice krispie mixture: In a large saucepan over low heat, melt the butter gently until it liquefies but does not brown—about 1–2 minutes. Add the mini marshmallows (and marshmallow fluff if using) and stir continuously to prevent sticking. Keep the heat low; you want the marshmallows to melt slowly into a glossy mass. Remove from heat as soon as the mixture is smooth, then stir in the vanilla. Immediately fold in the puffed rice cereal with a silicone spatula using broad, gentle strokes until every grain is coated. Let the mixture rest for 2–3 minutes so it is warm but not hot to touch; this keeps it pliable for shaping. Shape the balls: Lightly grease your palms with a small dab of butter or spray to prevent sticking. Scoop a tablespoon-sized amount and press gently into a compact sphere about 1 to 1.5 inches in diameter. If the mixture starts to crumble, press it slightly firmer—do not overwork it or the centers will become dense. Place completed balls on a parchment-lined baking sheet, spacing them a finger-width apart. Allow them to cool completely for 20–30 minutes so the centers set and hold shape. Melt the white chocolate: Place the white chocolate chips or candy melts in a microwave-safe bowl. Heat in 20–30 second bursts, stirring between each interval to avoid scorching. Once mostly melted, stir until smooth. If the chocolate seems thick or grainy, stir in up to 1 tablespoon of coconut oil to achieve a glossy, dippable consistency. Let it rest a minute to thicken slightly for more even coating. Coat and decorate: Working one or two at a time, dip each ball into the melted white chocolate using a fork, spoon, or dipping tool. Lift and tap gently on the edge of the bowl to remove excess coating, then return the ball to the parchment-lined tray. Immediately sprinkle the top with the red, green, and white nonpareils so they adhere before the chocolate sets. If you want extra shine, you can double-coat after the first layer sets. Set and serve: Let the coated treats set at room temperature for about 30–45 minutes, or place the tray in the refrigerator for 15–20 minutes to speed firming. Once the chocolate is fully set, transfer the bites to an airtight container and layer with parchment to prevent sticking. Arrange on a festive platter for serving or pack into boxes for gifting.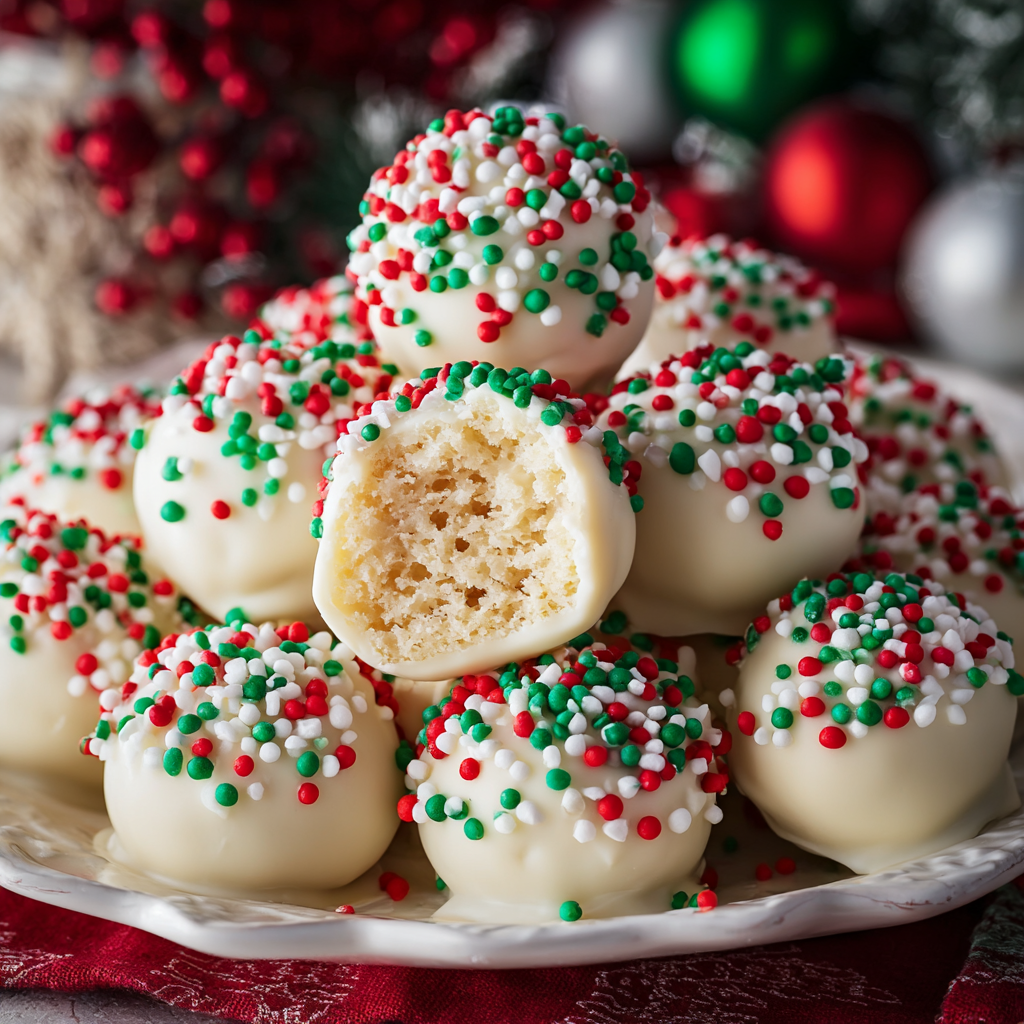
You Must Know
- These treats freeze well for up to 3 months if stored in a single layer in an airtight container with parchment between layers.
- They are high in simple carbohydrates and sugar—great for a sweet treat but best enjoyed in moderation.
- Allow the marshmallow mixture to cool slightly before shaping; otherwise it will be too sticky and difficult to handle.
- If using real white chocolate, avoid overheating; use short microwave bursts and stir frequently to prevent graininess.
- Nonpareils stick best when applied immediately after coating; keep sprinkles within arm’s reach while dipping.
My favorite aspect is how versatile these are: I’ve turned them into little gift boxes, used them as toppers for cupcakes, and even wrapped a few individually for teacher gifts. Once a neighbor asked for the recipe after finding them on her holiday table—she told me they reminded her of childhood celebrations. That memory is exactly why I keep making them.
Storage Tips
Store the bites in an airtight container at room temperature if you plan to consume them within 48 hours; longer storage is best in the refrigerator where they will keep for up to 7 days. For freezing, arrange in a single layer on a tray and freeze until firm, then stack with parchment sheets separating layers and seal in a freezer-safe container for up to 3 months. To thaw, unwrap and transfer to the refrigerator for an hour, then bring to room temperature before serving to avoid condensation forming on the white chocolate.
Ingredient Substitutions
If you need dairy-free options, use dairy-free butter and vegan white chocolate or candy melts labeled dairy-free; coconut-based chips can work well. Swap the white chocolate for dark or milk chocolate for a richer flavor; white chocolate provides the clean festive backdrop but any coating works. For a nutty twist, fold 1/4 cup of finely chopped toasted almonds or pecans into the puffed rice before shaping, but be aware this changes the texture and may affect how the balls bind.
Serving Suggestions
Present these on a tiered holiday tray or arrange in paper candy cups for a charming display. They pair wonderfully with hot cocoa, mulled cider, or a spiced coffee. For a dessert board, include salted nuts, chocolate bark, and fresh berries to complement the sweet bites. Garnish with extra nonpareils, edible glitter, or a drizzle of colored chocolate for an upscale look at parties.
Cultural Background
Rice cereal treats have roots in mid-20th-century American home baking, popularized as an easy-to-make sweet that families could prepare with minimal equipment. The classic combination of melted marshmallow and puffed rice became a staple at potlucks and school events. Over time, seasonal adaptations—like adding chocolate coatings and colorful decorations—made them a holiday favorite. The bite-sized format mirrors other festive sweets found across cultures where small, hand-held confections are favored during celebrations.
Seasonal Adaptations
In winter, stick to red, green, and white decorations or add peppermint extract to the white chocolate for a festive flavor. For other seasons, change the colors: pastel nonpareils for spring, orange and brown for autumn, or blue and white for a winter-themed party. You can also infuse the melted coating with a teaspoon of citrus zest or a few drops of flavoring to match the season.
Meal Prep Tips
Make the rice krispie centers a day ahead and store them uncovered at room temperature to keep them slightly firm before dipping the next day. This makes assembly easier and prevents the balls from becoming too sticky. If preparing for an event, dip the treats the morning of to ensure the coating remains glossy and sprinkles stay fresh. Use shallow containers and single layers for transport to avoid smashes.
These Christmas Rice Crispy Treats are a small, joyful project that delivers big holiday cheer. They’re easy to scale, easy to share, and a wonderful way to get kids involved in festive prep. Make a batch, experiment with colors, and enjoy handing them out to friends and family—these always start conversations and bring smiles.
Pro Tips
Let the marshmallow mixture cool 2–3 minutes before shaping to avoid burns and to make rolling easier.
If melted white chocolate is too thick, stir in up to 1 tablespoon of coconut oil for a smoother, glossier coating.
Press gently but firmly when rolling balls; overworking will make centers dense while under-pressing causes crumbles.
Apply nonpareils immediately after coating so they adhere before the chocolate sets.
This nourishing christmas rice crispy treats recipe is sure to be a staple in your kitchen. Enjoy every moist, high protein slice — it is perfect for breakfast or as a wholesome snack any time.
FAQs about Recipes
How long do these treats keep?
Yes. Store in an airtight container at room temperature for up to 48 hours, or refrigerate for up to 7 days. Freeze for up to 3 months in a single layer with parchment between stacks.
Can I make these dairy-free?
Use dairy-free butter and vegan white chocolate or candy melts labeled dairy-free. The texture may be slightly different but the result will still be tasty.
Tags
Christmas Rice Crispy Treats
This Christmas Rice Crispy Treats recipe makes perfectly juicy, tender, and flavorful steak every time! Serve with potatoes and a side salad for an unforgettable dinner in under 30 minutes.
Ingredients
Main
Instructions
Make the rice krispie mixture
In a large saucepan over low heat, melt the butter and add mini marshmallows (and marshmallow fluff if using). Stir until smooth, remove from heat, add vanilla, then fold in puffed rice cereal until fully coated. Let cool 2–3 minutes until warm but safe to handle.
Shape the balls
Grease your hands lightly. Roll the mixture into 1 to 1.5-inch balls, pressing gently if crumbly. Place on parchment-lined baking sheet and let cool completely.
Melt the white chocolate
Melt white chocolate chips or candy melts in 20–30 second intervals in the microwave, stirring between bursts. If thick, add up to 1 tablespoon coconut oil and let it sit briefly to thicken slightly for easier coating.
Coat and add sprinkles
Dip each ball into melted white chocolate, lift with a fork, tap off excess, return to tray, and immediately sprinkle with nonpareils so they adhere before the coating sets.
Set and serve
Allow to set at room temperature for 30–45 minutes or refrigerate for 15–20 minutes. Once firm, transfer to an airtight container or serving dish.
Last Step: Please leave a rating and comment letting us know how you liked this recipe! This helps our business to thrive and continue providing free, high-quality recipes for you.
Nutrition
Did You Make This?
Leave a comment & rating below or tag
@veralkitchen on social media!
Categories:
You might also like...

Crack Breakfast Casserole
A decadent, crowd-pleasing layered casserole with sausage, bacon, tender hash browns, and a creamy ranch-egg custard topped with melty cheddar.
Apple Crisp Cheesecake Bars
Buttery crust, a creamy cheesecake center, cinnamon-scented apples, and a crunchy oat topping—these bars are a brunch-ready hybrid dessert that’s irresistible.

Classic Apple Crumble
A warm, comforting apple crumble with a buttery, crumbly topping and tart-sweet Granny Smith filling—perfect with a scoop of vanilla ice cream.
Did You Make This?
Leave a comment & rating below or tag @veralkitchen on social media!
Rate This Recipe
Share This Recipe
Enjoyed this recipe? Share it with friends and family, and don't forget to leave a review!
Comments (1)
This recipe looks amazing! Can't wait to try it.
Comments are stored locally in your browser. Server comments are displayed alongside your local comments.
Hi, I'm Julia!
What's Popular
Get My 30-Minute Meals email series!
Quick and easy dinner ideas delivered to your inbox.